
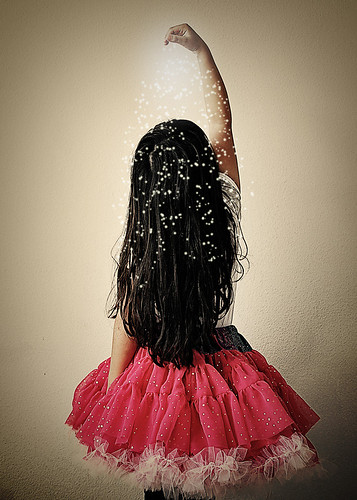
Before I write about my pettiskirt adventure, I wanted to share with you how I edited this photo. Below is the before shot ...

First, I used PW's colorize action. Second, I cropped it. Third, I added the pixie dust via this pixie dust photoshop tutorial (very easy to follow). Lastly, I darkened the edges with PW's quick edge burn action. I love learning something new with photoshop!
Now for the pettiskirt. It's STILL not finished, but it's close enough to share =) Plus, I wont be able to finish the skirt this week and I wanted to write a post about it while it's still fresh on my mind. The truth is.... it's not that difficult to make. Now that I've made one, I totally feel fine about making another one. In fact, I've even entertained the thought of a making a black one in my size, but quickly dismissed it as an 80's relapse moment.
Here is the front of the skirt....
 The bottom of the skirt is purposely hidden, because that's the part that is unfinished. I intend to sew a rolled hem on the top layer and finish the white tulle ruffle on the bottom layer.
To make the pettiskirt, I used the Martha Stewart Show Pettiskirt tutorial by Kandi Lightner. Below are some pointers if you are going to make a pettiskirt using this tutorial:
1. Watch the video before you begin sewing. Be sure to make notes on your tutorial paper such as what direction to fold the waist band, where the button hole placement is, where to attach front and back ruffles. The previously mentioned points are not very clear in the written directions.
2. Finish the raw edges. Unlike tulle, this material does fray very quickly.
3. The measurements for the pettiskirt tutorial (in my opinion) are for a toddler and not a 6 year old who wears a size 8. Unless I overlooked it, the tutorial never mentions what size it's for. I assumed the pettiskirts displayed on the mannequins in the tutorial looked to be the same size as my daughter. Bad assumption. This is what made the task very challenging. The pettiskirt only has 2 tiers per layer of chiffon. After the second tier, I realized the skirt was too short, so I added another tier. Every time I added a tier, I had to double the amount of fabric. I was sewing 4 EVER! Sheering and sewing, sheering and sewing......etc. I suggest measuring the length you desire, then replace the tutorial lengths measurements with yours. The width measurements are fine, it's the length measurements that are in question. This would have saved me a lot of time, money, and repentance for the curse words I kept saying..... in my mind.
In the end, I am very happy I made it for her. Before I made it, I thought it would be a neat pixie play outfit for B-girl. Now, as soon as it's finished, B-girl is required to eat, sleep, and go to church in it.
Jamie
19 comments:
Thanks for the heads up, I've been following this tale as I plan on making 3 of these little beauties.
Love the picture!
What a wonderful photo with a beautiful girl in a GORGEOUS pettiskirt!!
It's amazing how the fairydust looks as if it is for real....wauw!
That photo you edited is GORGEOUS!! I lovvvveeee PW's actions - they work miracles!
I made my own pettiskirt for my wedding and - phew - it was a journey. I just winged it with everything and it turned out (but not perfect for sure). Yours looks beautiful!
Thank you =)
I love the photo you edited! It looks so real! Very cool techniques.
The pettishirt is adorable andlooks like it was a lot of work despite the fact that you would consider making another one :)
Thanks for the editing tips - I love how your photo came out. I will check out that link.
Thanks for the picture modification references. Does it only work for photoshop? I don't have photoshop, only what came with my Mac.
I'm sure your shooga booga will want to eat, sleep, play, bathe and yes go to church with her pretty skirt. As for me, I'll stick to cakes and jewelry.
Jamie, i was wondering how you make that photo when i first saw it on flickr...now i know and thank you for sharing! I love the effect and the outcome of that photo...lovely!
Oh my your skirt is sooo pretty...love it so very much! Oh yay tutorial for that lovely skirt! Thankie!
Have a lovely merry happy day and lots of love to you and yours!
Absolutely gorgeous! I've made a couple pettis using the same tutorial...the last one I made with nylon chiffon which guess what? Doesn't fray!!! Wonderfully easy to work with and no need for any finishing on edges :) I had to order it online as it wasn't carried at Hancocks, Hobby Lobby or Joanns....
I love the editing you did as well! Lovely...
Thanks everyone for the compliments.
Goya - I think you do have to have photoshop to be able to apply actions. I'm not sure about the pixie dust.
Ihegge - That is very good to know about the nylon chiffon. I just may make one in my size ;)
Thanks Sarah. I enjoy dialogue (comments). =)
Great photo! It's unlike any I've seen- very creative. Love the petti too! The tutorial from MS is not very easy to follow! Very vague... Nylon Chiffon works best- it doens't fray and it's in-expensive. Shipping from on-line sources, however...not so in-expensive! I make and sell them too so I can appreciate the time and effort that goes into them!
That is such a pretty picture! It really highlights the equally pretty pettiskirt. Love the effects you applied too. Great job!
I love the pettiskirt! And I want to make one for myself. Any suggestions on how to do that...
Be sure to watch the video fist (linked in post).
Thanks =)
I saw that but I was wondering about measurements and how to figure out the length and width!
Thanks!
Oooh - I see =)
For width measurements, I suggest doubling your hip measurement. This will give you enough fabric to shirr. For the length, decide how long you want the pettiskirt to be & divide it by 3 or how ever many tiers you want. This will give you the width measurement of the fabric strips, which will be sewn together, thus making it your skirt length measurement.
I hope that helps =)
Now I get it!!!! Thanks a lot!
What a beautiful skirt, it's exactly what I want to make for my daughter, while I look for viagra online for my husband she can create it too.
Post a Comment