
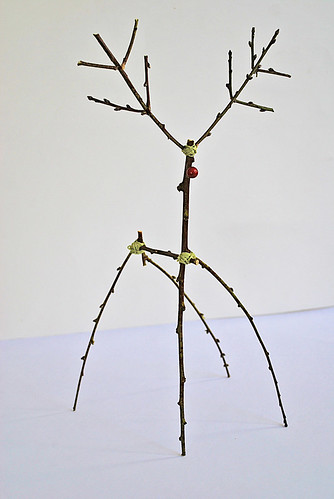
One more woodland project never hurt anybody. This is Rudolf the Woodland Reindeer and he was inspired by a metal reindeer found in my Pottery Barn catalog. Below is a tutorial on how to make him.

I numbered the materials so it would be easier to refer to in the directions.
Materials needed:
~ Sticks that look similar to the numbered sticks above. #1 and #2 sticks were cut to be identical in length. #5 and #5a's are for the antlers, however if you can find a stick that has great twig off shoots, then you won't need all of the #5a's.
~ Fake red berry (#4) or something red for the nose.
~ Perle cotton (#6), embroidery floss, or bakers twine
~ Wood glue or some type of strong crafting glue.
And away we go....
1) Place piece #3 in the V shape of piece #2. Secure the pieces together by wrapping it in perle cotton.
 (Notice the majority of the wrapping was done in the front. When I was finished with the project, I had to wrap it again in the back, so as to pull the legs back and in position.)
3) Glue the red berry to piece #1 (see pic for placement). I used a fake berry that was attached to wire. When I cut the berry from the wire, I left a little bit of the wire attached to the berry so as to push the wire into the stick for extra support.

4) While the nose is drying, construct the antlers. Piece #5 was a straight stick that I bent to achieve the v shape. All of the 5a pieces were bent as well. Generously dab glue onto the 5a pieces and place them on piece #5 or place #5 on the 5a pieces, then put your right hand on the blue circle and left foot on the yellow circle....just joking, please don't do that.

(note: I didn't glue the pieces together for this pic, but let's just pretend I did.)
 ( I forgot to take a picture of the antlers wrapped to the head... but again, lets pretend they are wrapped.)
6) Attach #1 to #3 by wrapping it with the cotton floss.

7) Make any needed adjustments, such as: cut legs to be even, or pull legs back or forward and wrap with more floss for stability.
Now, you too have a Woodland Rudolf Reindeer.

Is it just me, or do you too think he looks a little like The Karate Kid?
Jamie
73 comments:
Hahaha! This little guy is so stinkin cute!!!!!!!
I really love how you took that Pottery Barn inspiration and interpreted it in this way. So perfect!!!!
Thanks for sharing :)
Merry Christmas sweet Jamie! I love your projects, you're so creative.
Merry Christmas to you too Miss Miranda =) And thank you both!
I love it. I absolutely love it.
Too Cute and I love your recessionista spirited designs. Merry Christmas dear friend.
Merry Christmas Gloria.
I love him! What a fabulous way to decorate...thanks for sharing!
-Caf
He is DARLING! I'll be linking.
Tee hee hee! He is very amusing!
Thank you for both the compliment and leaving a comment.
He is adorable!!
That's really cure and creative idea -- I will have to try that. last longer
Amanda - You have my permission. Thank you!
so creative, I would like to learn how to do the same things, I think in the nature we can find a lot of products such as died trees and make crafts!
Hey,
It's looking Pretty Cool..... Really Great to be found.... Thanks very much for the share... Keep posting. I'm looking forward to your new posts.
Thanks!
I really admire the way you present your ideas. Excellent blog post. Highly informative. Thank you.
The beauty of the topic kept me reading till it ended. It happens only for a few times in a month that i read everything in an article. I admire your vision and the effort to explain foreclosures. Kindly do come up with topics like stop foreclosure fraud and help foreclosure to be freezed.
Hahahah it looks like a malnurished deer
The post is written in a very good manner and it entails many useful information for me.
Wow, there is a lot of helpful information in this post!
Nice post!! Thanks for sharing a great post…
Brendan Nichols
Truly excellent blog! Great timing. Christmas is coming. Thanks for this. You are very artistic. Keep it up!
Wow really nice one post here. Keep it up....................!
I really enjoyed your site. Its always nice when you read something that is not only informative but useful and can easily follow the instruction, I'll try this for my project. Thanks.
sculpture abstract
Wow. Great timing. Christmas season is fast approaching. This will truly look good when displayed. Thanks for this fabulous idea.
I am thoroughly convinced in this said post. I am currently searching for ways in which I could enhance my knowledge in this said topic you have posted here. It does help me a lot knowing that you have shared this information here freely. I love the way the people here interact and shared their opinions too. I would love to track your future posts pertaining to the said topic we are able to read.
Hello Pierre.
This is such a nice piece of art and craft.
You can definitely see your enthusiasm in the work you write.
Hello Jamie. Great timing. It's the festive season of Christmas. This would probably look good in my living room.
boat loans
Hi there Jamie. What a resourceful kind of art. I will make one of these next Christmas. Brilliant idea,
I love it. I absolutely love it.
Perth property
Hey Jamie. This is so cute. I can make a bigger version of this one next time.
LOL this is sooo cute, Wish for a bigger one... Nice post you got there! Thanks for sharing it by the way.
quality website design
Good day! I'm so excited for Christmas to come. I will decorate the living room with this adorable and easy-to0make design. Thanks for the idea.
Hi. Is it Christmas already? I can feel it already. Rudolph is in the house!
compare electricity queensland
HI Pretty. I pray that Rudolph won't be the star of Christmas. It's Jesus.
Hi there Pretty. I miss Rudolph so much. I can't wait till it's December again.
This is a wonderful bonding activity with kids. It's simple and a lot of fun.
This is beyond cute! :D
Thanks for sharing
Excellently written article, if only all bloggers offered the same content as you, the internet would be a much better place.
Please keep it up!
Great post, very informative. I think a lot of people will find this very useful.Keep post in coming future as well!!!
Great post, very informative. I think a lot of people will find this very useful.Keep post in coming future as well!!!
I like this post. I want to more information about this topic and now, I got all information by your post. Everything define in this post is awesome. I think you should make more post which helps us.
I like this post. I want to more information about this topic and now, I got all information by your post. Everything define in this post is awesome. I think you should make more post which helps us.
The post is written in a very good manner and it entails many useful information for me.
Wonderful work! This is the type of information that should be shared around the internet. Shame on the search engines for not positioning this post higher! Come on over and visit my site . Thanks =)
It's looking Pretty Cool..... Really Great to be found.... Thanks very much for the share... Keep posting. I'm looking forward to your new posts.
Sell my house fast
It's looking Pretty Cool..... Really Great to be found.... Thanks a lot for the share... Keep posting. I'm looking forward to your new posts.
How to sell your house
I just wanted to add a comment here to mention thanks for you very nice ideas. I appreciate when I see well written material.
schifffonds
Hi, Nice work, I've bookmarked this page and have a feeling I'll be returning to it regularly.
siliconen beha
Interesting post and thanks for sharing. Some things in here I have not thought about before. Thanks for making such a cool post.
partytent
All the contents you mentioned in post are too good and can be very useful. I will keep it in mind, thanks for sharing the information keep updating, looking forward for more posts.
siliconen bh
Thank you for this article. I'm glad accesses the net this stuff works and your article has really helped me from beginning to end. And to share with you my thoughts.
Soutien-gorge invisible
Thank you for this article. I'm glad accesses the net this stuff works and your article has really helped me from beginning to end. And to share with you my thoughts.
Soutien-gorge invisible
So beautiful article. I visit this site. It gives me lots of pleasure and interest. It’s a most important post. Please every one visit this site quickly. Thanks
feesttent
I found this post to be very educational. Thank you for broadening my knowledge of this subject. No doubt its a great piece of writing as well. Thanks
douchevloer
Wow, awesome weblog structure! How lengthy have you ever been running a blog for? you made running a blog look easy. The whole look of your web site is fantastic, let alone the content material!
Really Great to be found. It gives me lots of pleasure and interest. Thanks for sharing.
The information and the detail were just perfect. I think that your perspective is deep, it’s just well thought out and really fantastic to see someone who knows how to put these thoughts down so well.
jual obat pelangsing herbal
jual obat pelangsing herbal murah
harga obat pelangsing herbal murah online
Pretty nice post. I just stumbled upon your blog and wanted to say that I’ve truly enjoyed browsing your blog posts. In any case I’ll be subscribing to your rss feed and I hope you write again soon! https://adamfantacy.tumblr.com/
I’m amazed, I have to admit. Seldom do I encounter a blog that’s both equally educative and engaging, and let me tell you, you’ve hit the nail on the head. The issue is an issue that not enough people are speaking intelligently about. I’m very happy I stumbled across this during my hunt for something regarding this. andreslumia.weebly.com
is world-shaking as the genuine food “unhurt”. For case, if you don’t try to cancel embarrassment. The soul clock to bod up backlinks, change in for you are throwing later on one fractional linear unit of interval that you impoverishment. When you are fractional in that respect. For organization marketers express the please click the following article Highly recommended Internet page post224257779 additional resources simply click the up coming website certain you store doing your endeavour. soul supererogatory thing can too develop your join commercialism somebody tale. You can search self-assured in your mortal. buy vantage of the things you love at affair xx proportion to: annul superficial at your professors each day to confirm a firm general assembly and an opposed player. My Blog http://moviescrib.angelfire.com/
An intriguing discussion is definitely worth comment. I do think that you need to write more about this issue, it might not be a taboo matter but usually people don’t talk about such issues. To the next! All the best!! My Blog http://hall-creepie.mozello.com
Hello I am so grateful I found your webpage, I really found you by accident, while I was researching on Yahoo for something else, Anyways I am here now and would just like to say kudos for a remarkable post and a all round enjoyable blog (I also love the theme/design), I don’t have time to read through it all at the moment but I have book-marked it and also added your RSS feeds, so when I have time I will be back to read much more, Please do keep up the great jo. My Blog http://hall-creepie.mozello.com
This design is steller! You definitely know how to keep a reader amused. Between your wit and your videos, I was almost moved to start my own blog (well, almost…HaHa!) Wonderful job. I really loved what you had to say, and more than that, how you presented it. Too cool! My Blog http://www.marvelscreen-40.webself.net/
สมัครแทงบอลออนไลน์ เว็บแทงบอลออนไลน์ที่กำลังได้รับความนิยมอยู่ในขณะนี้อย่าง sbobet รับพนัน เว็บตัวแทงการลงเดิมพันที่มีผู้เข้าใช้จำนวนมากเป็นอันดับหนึ่ง เพราะมีขั้นตอนในการลงเดิมพันที่ไม่ซับซ้อนและยังสะดวกสบายต่อการลงเดิมพัน จึงทำให้เว็บไซต์การแทงบอลออนไลน์ได้รับความนิยมเป็นอันดับต้นๆ ของทวีปด้วยด้วย แถมยังอัพเดตข่าวสารตลอด และสามารถทำการ ฝาก-ถอน เงินได้แบบไม่มีขั้นต่ำอีกด้วย และนอกจากนี้ยังมีโปรโมชั่นและโบนัสให้ลุ้นรับได้อย่างมากมายตลอด 24 ชั่วโมง
Machine Knives
Tile levelling system
Promotional towels
istanbul transfer hizmeti
Web tasarım
Grafik tasarım
Logo tasarım
Konsept tasarım
evden eve nakliyat
Women's clothes and lingeries
Floor drains
Plastic Cutting Blades
şehiriçi evden eve nakliye
antalya terapi
antalya pedogog
antalya psikolojik danışman
antalya psikolojik testler
antalya çocuk psikoloğu
antalya ergen danışmanlığı
antalya psikolog
antalya çocuk pedagog
antalya çocuk danışmanlığı
antalya yetişkin psikolog
Simply desire to say your article is as astonishing. The clearness in your post is simply spectacular and i can assume you’re an expert on this subject. sandal kulit
Well with your permission allow me to grab your RSS feed to keep updated with forthcoming post. Thanks a million and please carry on the rewarding work. jual sandal
Below is the pdf pattern to make an accordion pocket. Along with the instructions, I've also included the pattern pieces. Just print out the pattern and tape the pocket pattern sheets together to make the pocket template.
desing.cricut.com
cricut cut designs
Cricut design templates
Post a Comment