
The following is a tutorial on how to make a fabric bird cage.
Materials needed:
- 20 gauge copper wire (about 4 yards)
- 1 fat quarter (18" x 22") for base
- 1/4 yard of fabric for cage wires
- 2" x 10" strip of fabric for base trim
- 4" diameter Styrofoam base (1" thick)
- paint brush
- 8 buttons
If your local craft store does not have all of the above supplies you can try Michaels or other online craft stores.
Directions:
1. Cut two circles out of your base fabric. You want your circles to be about 1/4" bigger then the base. It does not have to be exact, it just has to be a little bit bigger then the base.
2. With your paint brush, paint a thick layer of Mod Podge on top of the Styrofoam base. Next, place one of your fabric circles on top of the Mod Podged base. Smooth out the fabric. Mod Podge the overlapping edges around the side of the base. Add another thick layer of Mod Podge on top of the fabric. Be sure to cover all of the fabric including the edges. Don't worry if the Mod Podge is visible it will dry clear.
3. Pin the edges down and wait for it to dry. There will be some ripples on the side, don't panic the trim will cover it.

4. Repeat on the other side of your base. Wait for it to dry before making the trim.
5. To make the trim measure the thickness of your base and add a 1/2" to your measurement. My base measured 1" thick so I added 1/2" making the total measurement 1 1/2". Now measure the circumference of your base and add 1". The two measurements are the measurements for your trim.
6. Make a 1/4" fold along one of the short ends of your trim(wrong sides together) and iron the fold. Next, make a 1/4" fold along the long sides of your trim. Iron. I recommend sewing along the folds to give it a clean finished look. I forgot to do this with my sample =)

7. Mod Podge the sides of the base and glue your trim to the base. Be sure to overlap the trim when the ends come together. You want the folded side on top of the raw edge side. Put another coat of Mod Podge on top of the trim. Let it dry.

8. Cut 2 wires 24" long.
9. Make a casing for the wires by cutting 2 strips of fabric 32" long and 1 3/4" wide. Fold both ends of the strip in a 1/2 ". Iron. Now fold both of the long sides of the strip in a 1/4". Iron. Sew the short ends (see 1st pic below). Fold the entire strip in half length wise and sew along the length of the fabric. Do not sew the ends closed. You want a casing for the wires with an opening at each end.
10. Carefully slide the wire through the casing. Repeat with the other casing and wire. You will find the casing is longer then the wire. This is how the gathered look is achieved.

11. Using a safety pin, poke a hole into the trim (on your base). You want it to be centered. I usually place one of the holes where the seam is, so that the wire (next step) secures and covers the seam. Move the safety pin around so that the hole will be big enough for the wire. Make another hole opposite of the first hole. For the next two holes, you want to place them mid-way between the first and second hole. If the base where a clock you would want a hole at 12:00, 3:00, 6:00, and 9:00.
12. Poke the wire through the hole in the Styrofoam. You want the wire to go into the Styrofoam about 2" deep. Now take the other end of the wire and insert it into the hole opposite the first hole. Repeat this process with the 2nd wire.

Your cage should look like this:
 13. Now we will work on the wires that go around the cage (horizontal wires). Cut two 22" wires or measure the circumference you want for the horizontal cage wires and add 2".
14. Make your fabric strips as you did for the vertical cage wires. However, leave one end of the fabric raw (do not fold and iron). When you sew the casings be sure to stop 1" short of the finished end.
15. Carefully slide the wire through the casing. Join the ends of the wire by twisting them together.
16. Place the raw edge of the casing in the finished edge of the casing. Sew the casings together.
 17. Place the circular cage wires (horizontal wires) around your bird cage. Position them and secure in place by sewing on a button where the wires meet.
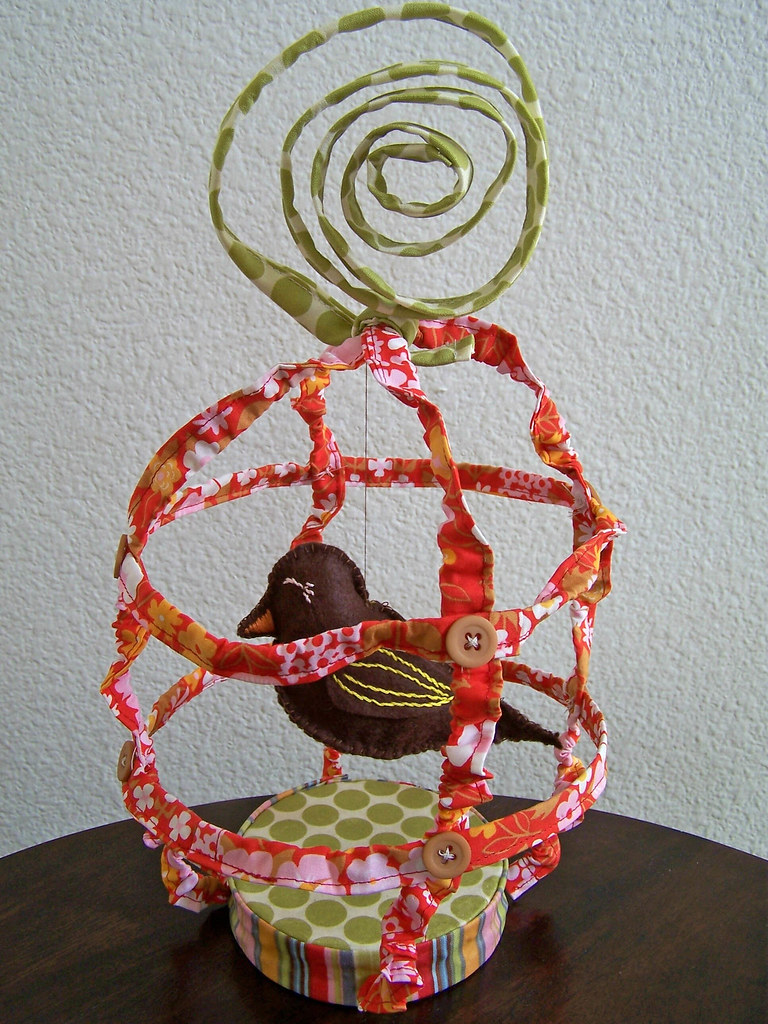
Now decorate your cage. To make the fabric wire scrolls, simply make a casing for the wire and close both ends. Wrap the fabric wire around the intersection of the fabric wires (top of cage) to secure it in position. Now for the fun part, scroll the extra fabric.

If you want to make a bigger cage you just have to use a bigger base and add another fabric wire.
For the cage below I used a 6" diameter base and added another fabric wire to both the horizontal and vertical fabric wires.

Enjoy!
172 comments:
Post a Comment